Showing posts with label Cupcakes. Show all posts

Friday, February 3, 2012

Little Gentelman "Rat Pack" Birthday Party

This party was thrown for my little guy, Grayson. We thought it would be fun to take a sophisticated 1960's Rat Pack gentleman theme and give it whimsical features fit for a first birthday. 


The bubble pipe we used through out the party was a perfect example of this! For the dessert table we created a tufted leather backdrop to fit over the TV space in our entertainment center. (A DIY tutorial can be found oun our blog for making this backdrop http://honeycomb-events.blogspot.com/2012/01/diy-tufted-leather-board.html). The patterns, houndstooth and plaid, were carried throughout including the cupcake wrappers, decorated cookies, adorable printables and custom made bow ties.


Upon arrival the little guests went to the "grooming station" and were fitted with a bow tie. Then they grabbed a sign with "Rules of a Gentelman" and acted them out while posing for the camera. It was great to see how boys and girls alike loved dressing up in bow ties and acting sophisticated! We also created a drinks station where guests were encouraged to mix up fun concoctions like Shirley Temples and Roy Rogers. Kids and adults alike had a great time sipping drinks out of brandy glasses and paper straws, feeling very dapper! We also wrapped vintage soda bottles with custom labels, paper straws, and a party label.  


The dessert table was fashioned after a gentlemen's conservatory, with built in bookshelves and leather tufted backdrop. We hand painted the beautiful sign too. We topped off each candle holder with a bow tie and a scrumptious cupcake. Guests helped themselves to spectacularly detailed bow tie and bubble pipe cookies. We wrapped brownies in craft paper and twine for an old-fashioned feel. And of course cake pops, can't forget these treats striped in chocolate plaids. Did you notice that the tablecloth is a pipe pattern? No detail is overlooked.


The favors had customized labels sewn onto muslin bags and included a bubble pipe and vintage candies. We had a fantastic time throwing this party and hope you will enjoy it also!


Check out our printables for this party on Etsy, and you too can have a little gentleman birthday bash!

Tuesday, January 31, 2012

Ships Ahoy!


We designed this baby shower with our client to celebrate her son and daughter-in-law's first baby. The baby's nursery was in a whale theme but the mom-to-be was having another shower in this theme. They wanted a shower that coordinated but didn't copy the whale theme. We thought a vintage nautical design would be perfect in a range of blues, off-white, and a touch of rustic red. Our sea-faring inspirations came from the iconic rope wrapped anchor.


We were blessed to start planning the shower from the beginning. This gave us the chance to design and craft the invitations.


Instead of a printed sign behind the dessert table we hand painted a large anchor and the baby's name on a large piece of canvas that lended to a more vintage look. We painted and distressed crates and then stenciled the words "Adore", "Easton", and "Always" on them. We made decorated crab cookies as favors and used the crates to display them. The mom-to-be took the crates home to use as nursery storage!


We used a mold to make color coordinated anchor decorations to place on the cake pops for a great dimensional look. 


And when we think of nautical, we think of weathered wood that's been exposed to the salty air so we an antiqued look to everything as well as treats that were both sweet and salty. We crafted these delicious salted caramel shortbread bites that were very popular. We also made red velvet whoopie pies because the mom-to-be loves red velvet cake.


To make all of the paper products look vintage, we printed on watercolor paper. The result was better than expected! The cupcake toppers had that look of being weathered by the sea air which was all because of the textured paper. Instead of a traditional pennant shaped banner we designed nautical flag shaped banner that was used in front of a table as well as mini nautical flags that wrapped around the vintage gallon jug.


We created a 'message in a bottle' station for the guests to write words of advice and encouragement to the new mom. Above this table was a huge television that our client asked for us to cover up. We designed a large sign which just looked like an amazing three dimensional sign and not just a TV cover up. On this table we also placed an amazing model ship! With a little paint and creativity, we made it a one-of-a-kind personalized piece of art.


The shower was so much fun to create and it was great that the mom-to-be wanted and was able to use the personalized crates, canvas artwork, and detailed wooden ship for the baby's nursery.


This party is available on our Etsy shop! Click here

Vendor Credit & Resources
Event Design, Invitation and Printables: Honeycomb Events & Design
Personalized canvas artwork with anchor: Honeycomb Events & Design
Cupcakes: Icing on the Cupcake Sacramento, CA
Cake pops, whoopie pies, and crab cookies: Honeycomb Events & Design
Floral centerpieces: Grandma-to-be, Cindy Keck
Crates (that were painted blue): Joann Fabric
Vintage Pepsi crate: etsy seller, amyrebeccadarabcsek
Anchor mold: globalsugarart.com

Thursday, November 17, 2011

DIY: Cupcakes in a Jar

Cupcake in a jar is a creative way to serve cupcakes and it's a lot more portable! Just be warned, it takes a TON of frosting! About twice as much frosting as a regular cupcake. These cupcakes in a jar were made using a 1 pint "jelly jar" size mason jar.


1  When you make the cupcakes, don't use liners. This way you won't have ridges when you place the cupcake in the mason jars. I used Cake Release by Wiltonin the cupcake pan but you could also use cooking spray.

2  Use an ice cream scooper to fill your cupcake pan with batter! The spring release action makes it easier and with a lot less mess! Fill each cupcake resevoir 3/4 full so you get a nice dome when they are baked. You'll need a more substantial cupcake to fill the jar nicely.


3  Extra large pastry tips are popular right now because they give a modern look. For this dessert I used an extra large frenchh pastry tip from etsy seller, Sweet Estelle.

4 & 5  This pastry tip is too big for the standard coupler so I cut the tip of a Wilton plastic decorator bag and put the pastry tip inside the bag.


6  Use a tall glass to hold up your pastry bag so you can fill it more easily. I even fold the ends around the top of the glass to get the frosting down in farther.

7  Once you have the frosting in the bag, squeeze it down into the pastry tip.


8  Cut your cupcake in half as shown. You'll have a top half and a bottom half.

9  I placed the top half in the jar first, so that it's at the bottom. Put the flat side of the cupcake down and the dome side of the cupcake up. The flat bottom of the cupcake looks best against the flat bottom of the jar.

10  Add a ring of frosting around the cupcake half that you just added. To save frosting you can just do an outside ring of frosting and not fill in the middle. Then place the other half of the cupcake in the jar. Top off with more frosting and voila! You have a beautiful party favor or fun treat for your guests!


Tie a wooden spoon around the jar with a cute ribbon or twine for an adorable look.
We got our wooden spoons from etsy seller Sucre & Spice.


We made these cupcakes for our Modern Faux Bois Owl Dessert Table.

You can also purchase the Printables.

Wednesday, November 16, 2011

Rustic Faux-Bois & Owl Dessert Table as seen on Amy Atlas


We're so thankful to Amy Atlas for featuring our dessert table on her blog! What a great compliment and a fabulous showcase for this gorgeousness! 


This dessert table was created for a second time mom who wanted the gender of the baby to be a surprise. We thought, let's go neutral and embrace the season with a rustic modern dessert table! We designed our own chic owl illustration and all of the custom printables in the fall color scheme. Combine these with some fabulous modern and woodland pieces and it gives the table a lot of warmth and charm. 


We wanted to use burlap in a refined way. Paired with some grosgrain ribbon and the mom-to-be's initials, it makes a darling cupcake topper. 


We brought in a striking pop of color and a taste of fall with fig tartlets on a mossy green bed.  


We also made the owl cake pops and put them on a branch formed from fondant. 


Each guest took home a cupcake in a mason jar with their own wooden spoon. "It's been a Hoot!"


We even designed the custom invitations!


This dessert table was designed and styled by Honeycomb Events & Design. We also made the cupcakes, cake pops and tartlets as well as photographed the table.


Want to throw your own Rustic Faux Bois & Owl Baby Shower? You can purchase the Printables.

Friday, November 11, 2011

Honeycomb to the Rescue!


This super hero party journey began with a particulary wonderful client of ours who has a son that loves comic books, Green Lantern in particular. With the movie's release this past summer, there was no shortage of themed paraphernalia flooding the marketplace. We wanted to make things unique and not something you could buy in a store so we went in a different direction. Let's make it old school, keep it rooted in the comics, and give it some real retro styling.

Our client loves to go big, inviting the entire neighborhood, so it's always, "I love it, now I want a hundred." Planning for over 300 individual pieces of dessert, and over 100 props can get overwhelming, but we're getting good at making spreadsheets and delegating our time. At least we think we are.

Designing the invitations for the party solidified our goal of creating a super hero party that harkened back to another time. This invitation resembled WWII military recruitment posters. The hexagon pattern and sharp rays of light will be themes repeated throughout other custom made printables and labels.


First, we thought that our birthday boy should have his own comic book to give out to his friends as a favor. We teamed up with a great graphic artist on Etsy, provided him with the storyline, pictures of the birthday boy, Christian, and shots of the neighborhood. Just two weeks later and we had the finished product, a personalized comic featuring Christian as the newest Green Lantern. Christian was showing it off to all his friends, and so were we.


The use of fabric really elevated our dessert table destination. In addition to layering our tablecloths on the different levels, we created a canopy style top and curtains on the side of our space mimicking rays of green light, framing our dessert tables. The custom painted skyline on our fabric backdrop completed the feast for the eyes. Top it off with a custom-made, three-dimensional, 18-inch high green lantern symbol that actually glowed. For the desserts, we went back to our (and our client's) favorites: designer cake pops, cream cheese frosted cupcakes, and candy coated popcorn to name just a few. The dessert table set-up was modified to showcase layers and levels of different desserts. Because of this design, there was less space for the ever increasing number of desserts we were bringing. We gave the edible works of art their deserved breathing room. We kept the table clean and organized by highlighting only a dozen of each dessert and refilling throughout the afternoon. The cake pops were decorated with royal icing transfers of Green Lantern masks and the Green Lantern logo. Oreos were dipped in white chocolate and then we cut out the Green Lantern logo from green Wilton sugar sheets and placed them on the Oreos.


The favors were starting to take shape: the amazing customized comic, personalized party blowers, and now something to satisfy the children's sweet tooth. We pitched the idea of the cupcake push pop to our client and she loved it. This was going to be our "wow" item. The clear push pop tube that surrounds the cupcake screams out for decoration. We turned our little push pops into mini Green Lanterns, donning a uniform and mask, complete with cut-out eyes and lantern symbol. For the uniform and mask, we made our own stickers. Your local print shop can print on more than just paper. These are vinyl adhesives. The sophisticated printer that created these, can also cut out the intricate designs, eliminating hours of tedious labor. Isn't technology amazing? Now that we knew what was going into the favors, what exactly were they going into? Initially we thought of a tube or cylinder design. The comic and push pop would fit nicely into that. Jennifer expanded on that idea and found these great clear plastic paint cans. When it came time to decorate the cans, Jeff had an epiphany. The cans have a handle just like the "lantern" the Green Lantern uses. We could turn the kid's favor container into their own take home lantern! Our favorite new medium came into play again. The vinyl adhesive would wrap around the bottom half of the can transforming it into a wonderful keepsake lantern.


Any party would not be complete without a photo booth area. And since we're in comic book land, every guest needs to showcase a feathered fedora, styrofoam barbell, and birthday wishes speech bubble.


For the dining tables, we created a city scape centerpiece using boxes wrapped in colored paper, and went back to our wonderful vinyl adhesives for miniature windows and doors. To complete the look, we added yellow strips to our marbled gray table runner, literally creating a "road runner" underneath our mini skyline. Too cute for words!


All was set for a spectacular, fun filled day. As the children arrived we gave them their very own ring and mask, since we wanted them to enjoy those items during the whole party. Christian had a blast playing with his friends in the giant mobile game truck, and the adults marveled over all the details, and delicious desserts. Many of them finding it hard to believe that we do it all ourselves, and yes, believe it folks, we did it all ourselves.


Vendors & Credits
Event Design: Honeycomb Events & Design
Cake pops, decorated cookies, dipped oreos, fondant cupcake toppers and all other desserts: Honeycomb Events & Design
Invitation, Printables and Printed Signs: Honeycomb Events & Design
Local Printer: Cole Print & Marketing, Concord, CA
Custom Linen Creation: Honeycomb Events & Design
Green & Black Paper Straws: etsy seller 'domesticcharm'
Green Cupcake Liners: etsy seller 'sweettreatsupplies'
Plastic Push Pop Containers: etsy seller 'craigjen'
Comic Book Illustration: Stephen Thornton, etsy seller name  'comicgenius'
Clear Plastic Paint Can: purchased at Michaels

Wednesday, September 21, 2011

The House of Minnie Mouse


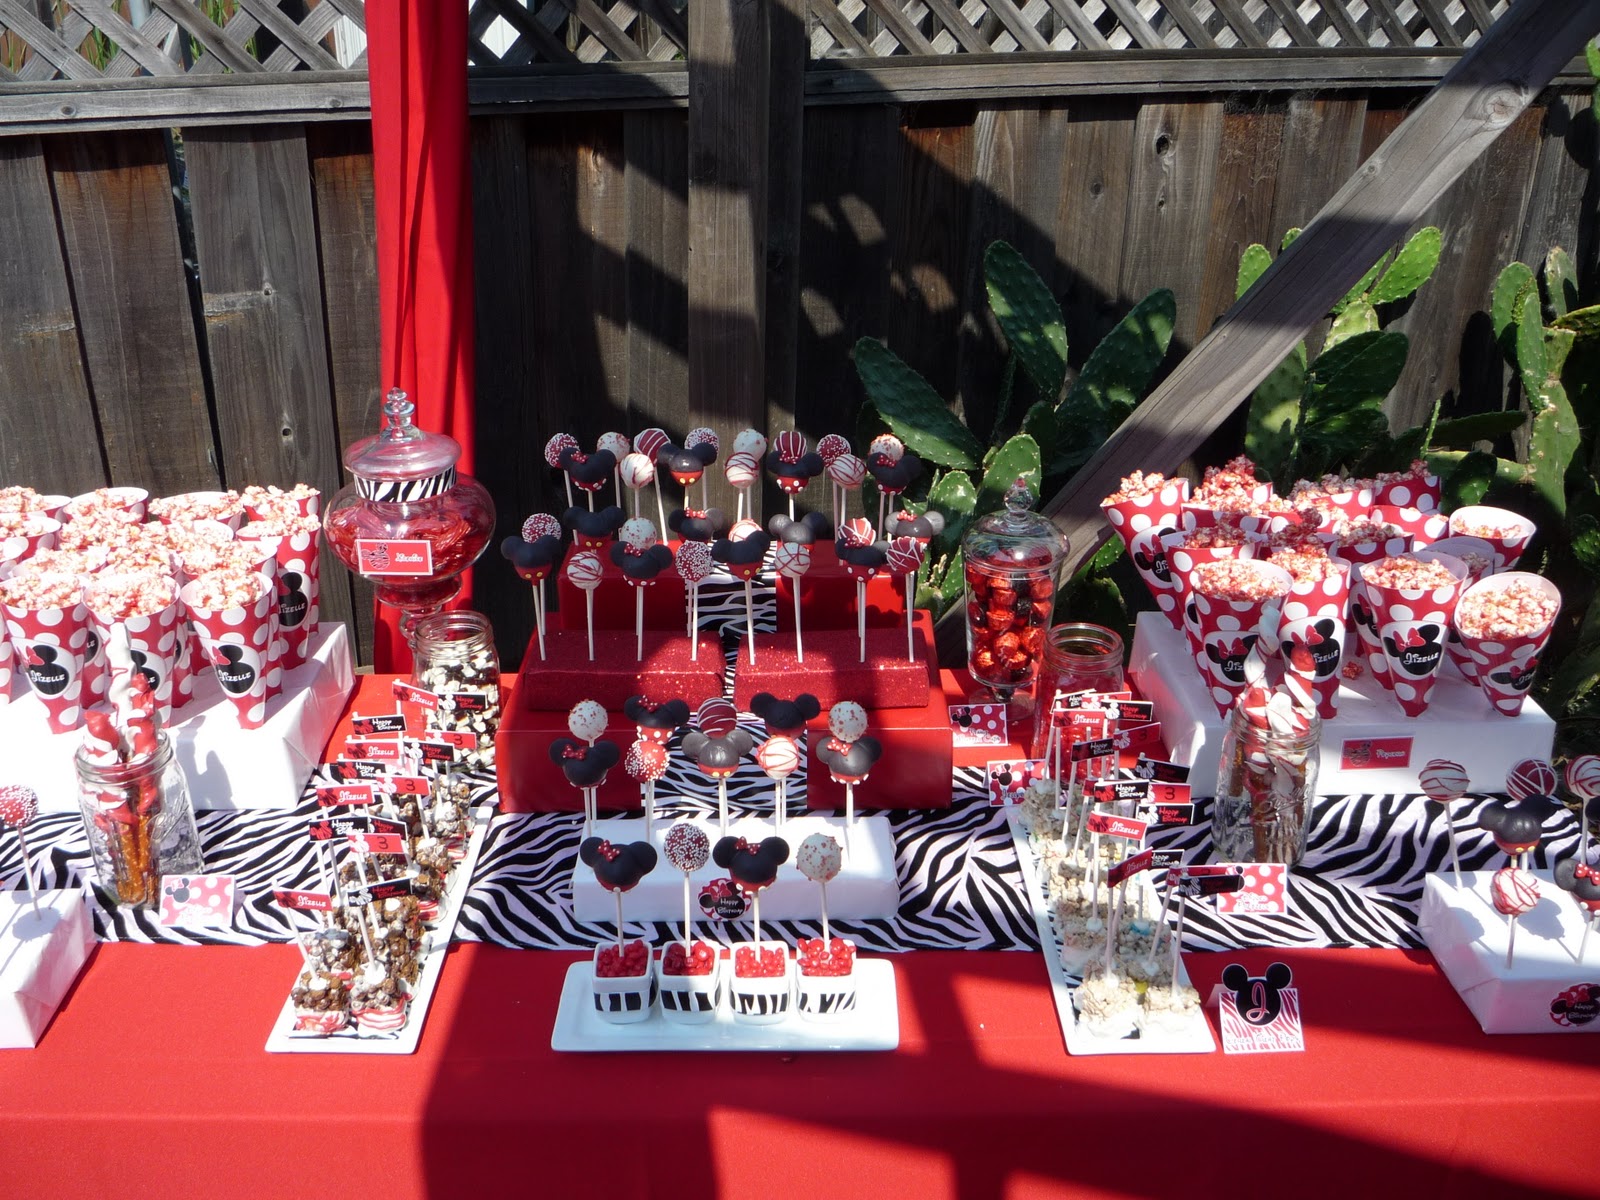
One of our biggest challenges to date. Transform a backyard into a Disney paradise. Our client wanted a very large assortment of goodies for her daughter's 3rd birthday party. We needed three full size tables just to accommodate all the desserts.


The head table featured our zebra cupcakes, rice krispie pops, enormous Mickey and Minnie cookies, chocolate dipped Mickey oreos, chocolate drizzled popcorn and fudge dipped caramel pretzels. Let the sugar coma commence!


Look at those cookies! Jennifer painstakingly created these sugar cookies. That frosting is flawless. Also, check out the pop out ears on the food labels, adorable.


The second table featured our candy confections. More of the incredibly popular and delicious popcorn and fudge covered, caramel pretzels. Our cake pops are always a show stopper. I'm not sure what you would call these, but incredible works of art, is a start. Jennifer raised the bar with the Mickey and Minnie versions.


Our client also wanted other cereals turned into marshmallow pops, like cocoa puffs and Lucky charms.


All the children loved our candy buffet. More licorice, gummi bears, and jelly beans than they could handle.


The third table polished off the wonderful decadance. What better way to finish off a party than with milk and cookies. Each child got their own bottle of milk with decorated straw. 


We added balloons in the theme colors of black, white, and red and theme patterns, polka dot and zebra print to fence posts as well as create these custom table centerpieces.


PageList1